DIY
DIY Photosensitive Robot Firefly Kit LED Breathing Light Soldering Light Active
DIY Photosensitive Robot Firefly Kit LED Breathing Light Soldering Light Active
Couldn't load pickup availability
Brand: DIY
PCB Type: FR-4
Type: Starter Kit
Model: DIP Soldering Kit
MPN: Does Not Apply
Country/Region of Manufacture: China
DIY Kits. Condition is Brand New. Sent with Australia Post Domestic Regular Letter.
Photosensitive Mobile Robot Firefly DIY Kit LED Breathing Light Electronic Part
Features:
Photosensitive automatic movement
The tail breathing light flashes automatically
simple circuit
DIY Manual Soldering
Simulate Firefly
Product parameters
Name: Photosensitive Firefly Robot
Size: 40×43.2mm
Supply voltage: DC 3V
Base material: PVC sheet
Battery type: CR2032 button battery (product without battery)
Sensing device: photo-resistor
Power source: flat motor 3V
Tail Lights: Blue LED 5MM
Shipping list:
1 x Firefly DIY Kit
1 x (2032) coin battery
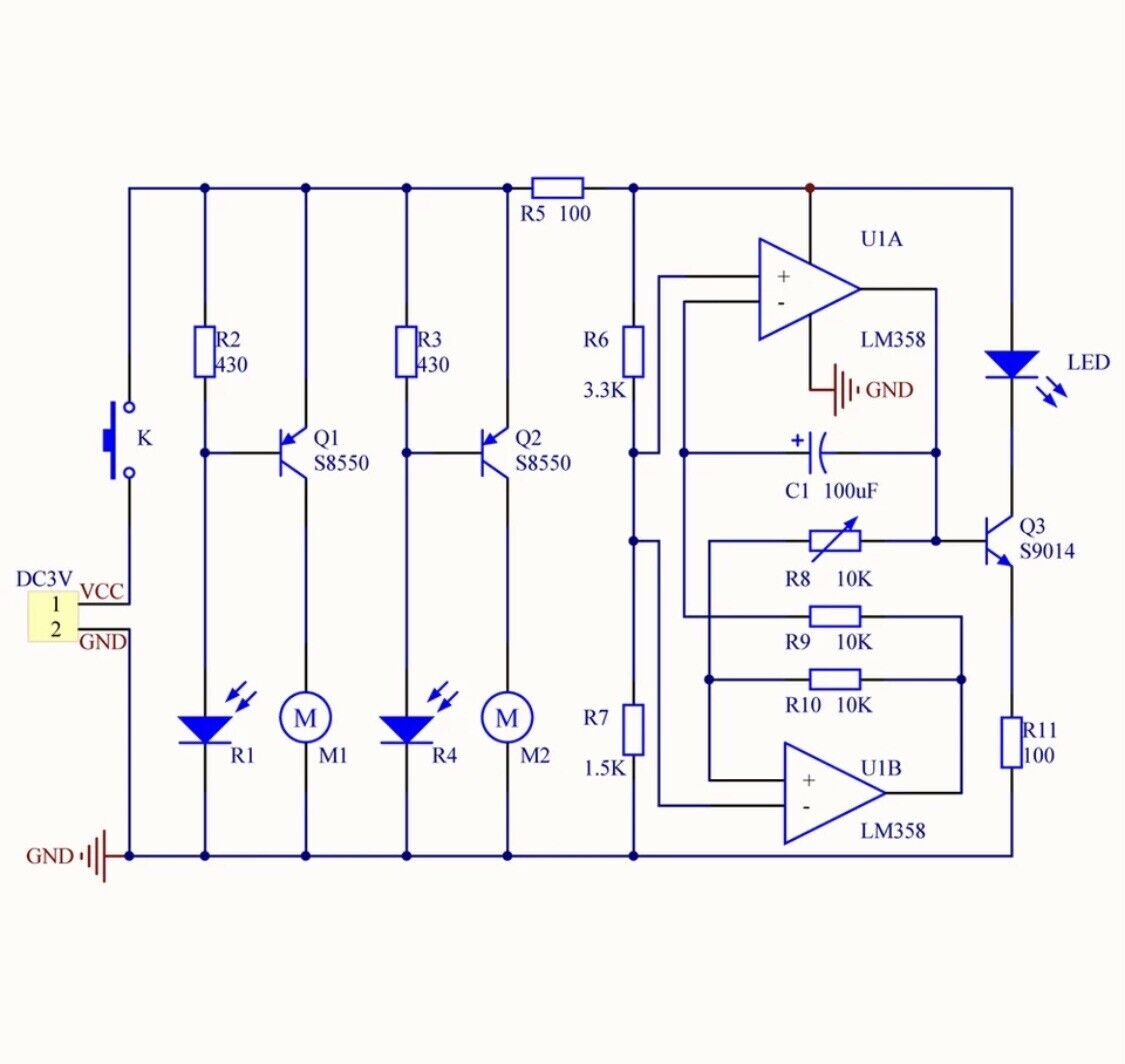
This is a starters level led light activated kit with all values included in the solder mask. We have also included a schematic of the kit in the photos.
If you need help with any part, please message us. Every kit we sell has had a sample built by us to make sure it works.
1). SFT-Q03YH is a Photosensitive Mobile Robot Simulation Firefly Electronic DIY Kit.
2). It can simulate the automatic flashing of fireflies, and according to the photosensitive sensor, it can automatically move towards the light at night.
3). It is a very interesting Mini DIY electronic product, which enables kids to understand the circuit more clearly and learn welding skills.
Function:
1.Manual welding:
This product is a kit, you need to weld it yourself. After completion, it will be a unique artwork.
2.Sensitive movement:
There are two photosensitive sensors on right and left (R1/R4) which simulating the antennae of fireflies. When the light reaches the antennae R1 or R4, Transistor Q1 or Q2 will turn ON, and then the corresponding motor starts to vibrate so that the firefly moves in the direction of light.
3.Breathing light:
The breathing lamp circuit is controlled by lm358 chip, which can simulate the effect of fireflies' slow ON and OFF.
4.Blue potentiometer
Used to adjust the sensitivity of the blue LED light; control the blinking frequency of the breathing light. Imitate the flash effect of fireflies
5.High-quality photosensitive sensor
The light-sensitive sensor is covered with a heat-shrinkable tube to help gather the light, so that the fireflies can better condense the light and move.
6.Button battery powered
Button batteries are not included, customers need to purchase matching button batteries by themselves
Feature:
1).Photosensitive automatic movement
2).Breathing light flashes automatically
3).Perfect simple circuit
4).DIY hand soldering
5).High simulation firefly
Installation Tips
1>. The user needs to prepare the welding tool first.
2>. Please be patient until the installation is complete.
3>. The package is a DIY kit. It need finish installing by the user.
4>. The soldering iron can't touch the components for a long time(1.0 seconds), otherwise, it will damage the components.
5>. Pay attention to the positive and negative of the components.
6>. Strictly prohibit short circuits.
7>. The user must install the LED according to the specified rules. Otherwise, some LEDs will not light.
8>. Install complex components preferentially.
9>. Make sure all components are in the right direction and right place.
10>. Check that all of the LEDs can be illuminated.
11>. It is strongly recommended to read the installation manual before starting installation!!!
12>. Please wear anti-static gloves or anti-static wristbands when installing electronic components.
8.Feature:
1).Photosensitive automatic movement
2).Breathing light flashes automatically
3).Perfect simple circuit
4).DIY hand soldering
5).High simulation firefly
9.Installation Tips
1>. The user needs to prepare the welding tool first.
2>. Please be patient until the installation is complete.
3>. The package is a DIY kit. It need finish installing by the user.
4>. The soldering iron can't touch the components for a long time(1.0 seconds), otherwise, it will damage the components.
5>. Pay attention to the positive and negative of the components.
6>. Strictly prohibit short circuits.
7>. The user must install the LED according to the specified rules. Otherwise, some LEDs will not light.
8>. Install complex components preferentially.
9>. Make sure all components are in the right direction and right place.
10>. Check that all of the LEDs can be illuminated.
11>. It is strongly recommended to read the installation manual before starting installation!!!
12>. Please wear anti-static gloves or anti-static wristbands when installing electronic components.
Shipping list:
Firefly DIY Kit* 1
Shipping & Returns
Shipping & Returns


